

A resin floor is only as reliable as the concrete beneath it and the system applied on top. Key resin flooring installation mistakes to avoid include coating an unprepared or damp slab, measuring resin and hardener incorrectly, and applying the mix after its working time has passed. A stable, clean, dry, properly profiled base and careful mixing help reduce the risk of delamination.
It’s easy to focus on the resin, but a strong bond starts with the concrete. Careful preparation and mixing help prevent adhesion problems, soft patches and an uneven finish.
This guide covers concrete preparation, accurate mixing and ways to reduce delamination risk, so you can see what matters at each stage of installation.
Key Takeaways
- Prepare the concrete beyond a simple sweep: surface condition and texture affect how well resin bonds.
- Follow the product instructions for measuring and mixing each component to help avoid soft or patchy areas.
- Assess moisture in the slab before installation, as damp concrete can undermine adhesion.
- Learn which preparation and application details matter most for a durable, well-bonded finish.
1. Concrete surface preparation and profiling
Resin bonds to prepared concrete, not to dust, grease or loose material. Inspect the surface for cracks, damage, old coatings, oil and movement. Repair cracks and surface defects before applying the coating. If the substrate is moving, stabilise it and consider suitable joint detailing. Skipping these steps can lead to adhesion failure, peeling or visible cracks.
A quick sweep is not enough to prepare concrete for resin flooring. Grease, oil, dust and remnants of previous coatings can prevent proper bonding. Remove contamination and loose material, then mechanically profile the concrete by grinding, shot-blasting or scarifying. Choose a method that suits the concrete’s condition and the intended coating, rather than relying on cleaning alone.
The required surface profile depends on the resin system. A profile of 2-3 CSP is specified for primers and thin-film systems; 4-5 CSP is recommended for 100% solids and self-levelling epoxy. These are concrete surface profile grades, not measures of coating thickness. Match the finished texture to the system’s instructions so the resin can grip the prepared surface.
Grinding creates dust, so use suitable extraction during mechanical preparation and remove residual dust before priming or coating. Planetary diamond grinders suit thin-film epoxy preparation, while shot-blasters are recommended before high-build epoxy applications. Acid etching is less reliable than mechanical grinding and is generally limited to very light residential applications.
Before application, check the entire prepared area for contamination, weak concrete and uneven profiling. Confirm that the primer is compatible with the substrate and resin system, and follow its instructions. Record site humidity and surface condition, since environmental conditions can affect curing and bonding.
2. Resin and hardener mixing
Before opening an epoxy kit, assign one person to measure and mix while another manages application. This keeps the mixing sequence consistent and the prepared surface ready. Check each container’s product name, shelf life and matching components. Resin and hardener from different systems may not cure as intended.
Follow the manufacturer’s technical data sheet for the correct resin-to-hardener ratio and measurement method. Weight and volume ratios are not interchangeable because components can have different densities. Measure accurately, then mix for the time stated in the instructions. Five minutes is an example, not a universal mixing time.
For full-sized kits, use a low-speed, high-torque mechanical mixer with a helical blade. Blend the sides and base of the container, then mix any aggregate evenly through the resin. Excessive speed can draw air into the mixture; mixing above 500 rpm is identified as a mistake. Incomplete blending can leave soft spots, patchy curing or colour differences.
Prepare batches that can be applied within the product’s pot life. Epoxy’s exothermic reaction can speed up curing in the container, making an oversized batch difficult to spread evenly. Follow the manufacturer’s recommended temperature and humidity range, and check site conditions before mixing. Temperature changes can affect flow, finish and curing.
For safety, read the product safety data sheet before work begins, use the specified protective equipment and provide the recommended ventilation. Control access to the work area, keeping people without suitable protection away during mixing and application. In the UK, follow the product instructions and safety data sheet; do not assume one ventilation method suits every resin.
3. How can I stop resin flooring from delaminating?
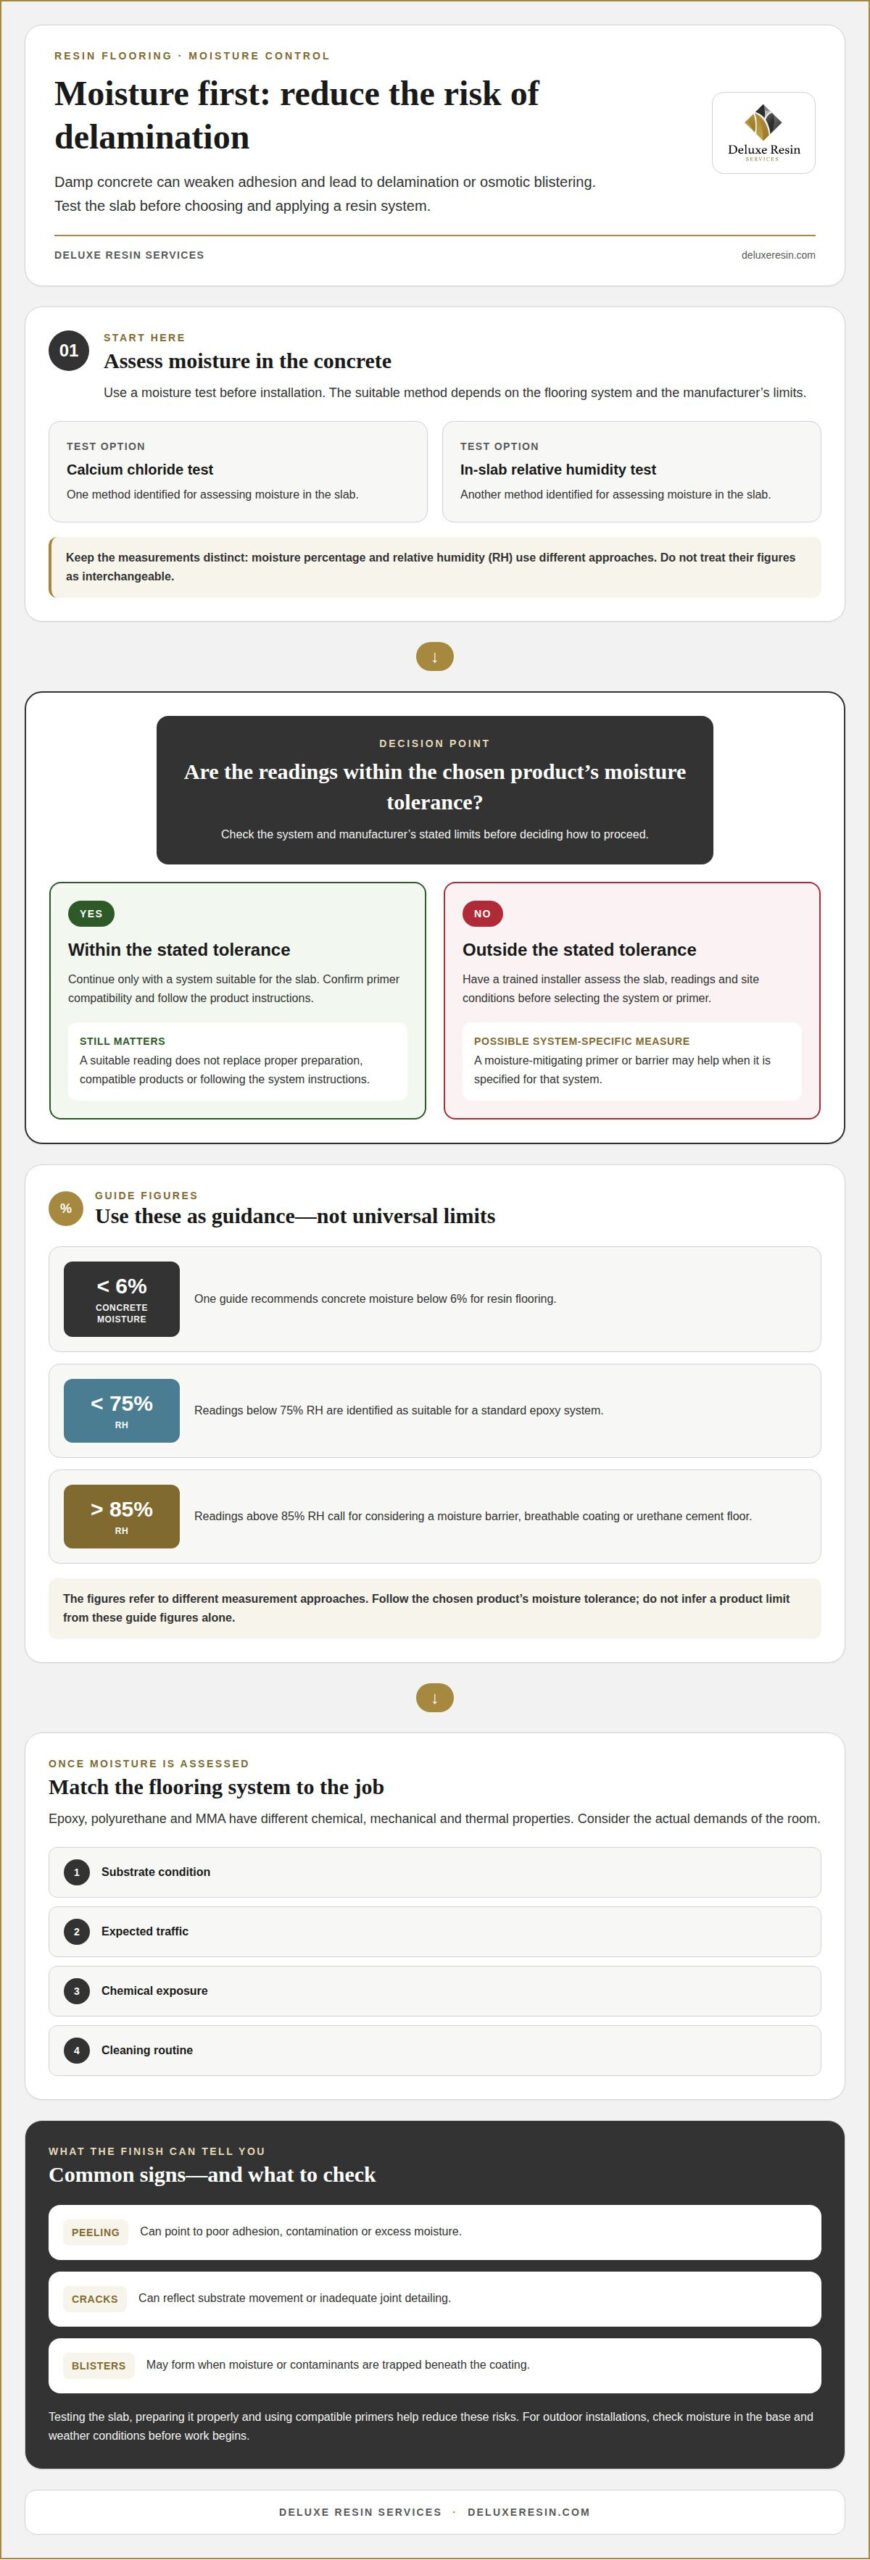
Start with moisture testing: damp concrete can weaken adhesion and cause delamination or osmotic blistering. A calcium chloride test or an in-slab relative humidity test can assess moisture in the slab. The appropriate method depends on the system and its manufacturer’s limits.
One guide recommends concrete moisture below 6% for resin flooring. It also identifies readings below 75% RH as suitable for a standard epoxy system, while readings above 85% RH call for considering a moisture barrier, breathable coating or urethane cement floor. These figures use different measurement approaches, so don’t treat them as interchangeable. Follow the chosen product’s moisture tolerance.
If readings exceed the system’s tolerance, a moisture-mitigating primer or barrier may help when specified for that system. A trained installer should assess the slab, moisture readings and site conditions before choosing the primer and equipment. For outdoor installations, check moisture in the base and weather conditions before work begins.
Choose a resin system to suit the substrate, expected traffic, chemical exposure and cleaning routine. Epoxy, polyurethane and MMA have different chemical, mechanical and thermal properties, so the room’s demands matter as much as the concrete.
DIY installation becomes challenging when it involves moisture testing, mechanical preparation, primer selection and controlled application. A trained professional can coordinate these steps and assess whether the substrate is suitable before installation.
Peeling often points to poor adhesion, contamination or excess moisture. Cracks can reflect substrate movement or inadequate joint detailing, while blisters may form when moisture or contaminants are trapped beneath the coating. Testing the slab, preparing it properly and using compatible primers help reduce these risks.
For a resin floor planned around your room and substrate, discuss your flooring project.
Deluxe Resin Services: Domestic Resin Flooring
Deluxe Resin Services installs Domestic Resin Flooring for homeowners seeking a seamless finish, as well as Industrial Resin Flooring for commercial environments. If you want professional support with substrate assessment, system selection and installation, the team can help plan the work rather than leaving complex preparation and bonding steps to you.
For projects where environmental considerations matter, Deluxe Resin Services also offers Sustainable Resin Solutions. Its products are formulated with up to 85% renewable, plant-based materials and hold certifications including EMICODE EC1 PLUS® and Cradle to Cradle. The right approach depends on the concrete’s condition and the room’s intended use, so installation planning should account for both before work begins.
Contact Deluxe Resin Services to discuss your domestic resin flooring project.
Plan your flooring project with confidence
Choosing a floor is also a chance to plan how the space will be used, maintained and experienced over time. Keeping resin flooring installation mistakes to avoid in mind can help you have a more informed conversation about the room, substrate and finish you want, before installation begins.
Deluxe Resin Services installs domestic and industrial resin flooring, as well as resin driveways. If you’re planning a flooring project or considering a resin surface outdoors, share your plans with the team and discuss the next steps.
Contact Deluxe Resin Services to talk through your project. With careful planning and the right approach, you can move towards a resin finish that suits your space.
Frequently Asked Questions
How can I stop resin flooring from delaminating?
To prevent delamination recurring, identify the cause before applying another coating. If a floor has lifted, inspect where the separation occurs: at the concrete interface or between resin layers. This can help show whether the issue relates to the substrate or the coating system. A professional can assess the affected area and use adhesion testing to inform the repair approach.
What causes bubbling and blistering?
Bubbles can form when air escapes from porous concrete into fresh resin, while blisters can develop when moisture or contaminants interfere with bonding. Note whether defects cluster over porous areas, damp patches or local contamination; the pattern can help distinguish possible causes. Sealing and priming porous concrete, when required by the system, can reduce the risk of air-related bubbles.
What causes delamination?
Delamination occurs when a resin layer separates from the concrete or another coating layer. The location and appearance of the separation can help identify the cause: a clean concrete surface beneath lifted resin points to an interface problem, while separation between coats suggests an issue within the layered system. Diagnose the failure before repair to avoid repeating the problem.
Where can resin flooring installation go wrong?
Problems can arise at transitions as well as across the main floor. Pay attention to edges, doorways, drains, joints and changes in substrate, where coating thickness or movement may vary. After application, protect the floor from traffic until it reaches the system’s specified curing stage. Early access can mark or damage the finish before it has hardened sufficiently.
What are the most common resin flooring installation mistakes?
Resin flooring installation mistakes to avoid include incorrect component ratios, uneven mixing and applying resin beyond its working time. Also avoid overlooking site conditions that affect flow and curing. Keep product instructions to hand, and plan preparation, mixing and application as one coordinated process. A clear batch sequence can help keep the work consistent.